A Whole Home Energy Monitoring Solution Compatible With Home Assistant
The Refoss Smart Energy Monitor EM16 (Amazon link) is a versatile monitoring system perfect for those looking to track the power consumption of large appliances and entire home circuits. As someone in a fully electric home, I found this device invaluable for gaining detailed insights into my energy usage and creating meaningful automations for monitoring large appliances.
I wanted to monitor the current, or power consumption, of several large appliances that I could not monitor with just smart energy monitor plugs (Amazon link). I also did not want to accidentally turn off the power to something like the refrigerator, as typical smart plugs have the ability to turn the plug on/off. Being able to monitor the current consumption and peak amps of a larger appliance allows me to gain possible insights into the health of the appliance.

For example, I arrived home on a hot Texas-summer day to find that our heat-pump HVAC system was running, but it was almost 90°F inside our house. If I had had a way to monitor the power to our HVAC system using an automation that would trigger if the HVAC was running for over a given period of time without cycling off, it would be one way to notify me in advance that there was an issue with our HVAC (there are certainly other ways). Along the same lines, I have an automation working currently that if we leave the stove on for over a period of time, it will alert us on our phones that we may have left the stove on accidentally.
I’ve included some basic Home Assistant YAML code at the bottom of the page to help you get started on monitoring large appliances for issues or when the appliance is done with a run-cycle.
Installation of the Refoss EM16 Smart Energy Monitor
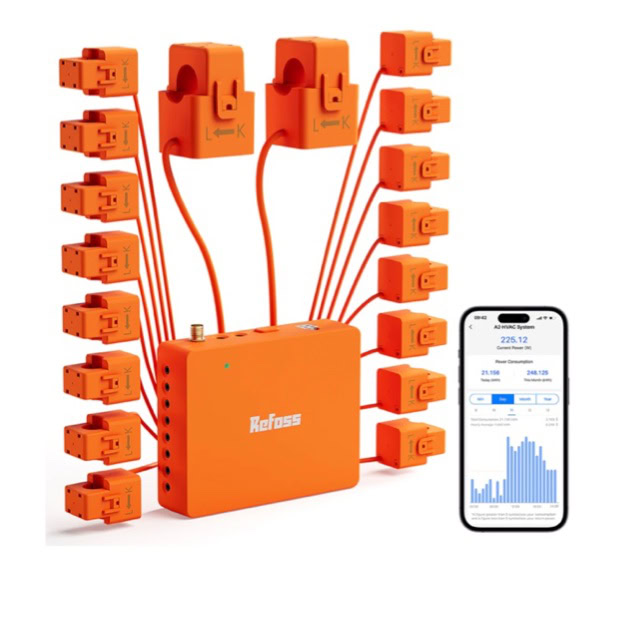
The installation was straight forward with no need to pull the wire out of each breaker, because the Circuit Transformers (CTs) unclip to open up and clamp loosely around the insulated wire and then each CT easily plugs into headphone-jack-style ports on the hub that sits inside the panel. The EM16 includes 2 main CTs, each rated at 200 amps that are installed onto the main feeds coming into the electrical panel, and 16 individual Circuit Transformers, individually rated at up to 60 amps to monitor up to 16 individual circuits. Keep in mind that for any appliance that has 2 hots going to the appliance, this will require a CT for each wire to be more accurate, or in some cases, you may want to use a power factor of “2” and only use 1 CT – if the power to both phases are very similar, like an electric heating element.
The only real issue that I had was when I assumed the size of the knockout on my exterior electrical panel would be the same size as the rubber pass-though grommet included on the WiFi antenna, it looked really close! 🤦♂️ But it was not exactly the same size, and the grommet was a little too loose to properly seal the factory knockout I removed. It would be great if Refoss included different size grommets.
People have mentioned in Amazon reviews that the instructions were incorrect when they installed the Smart Energy Meter and see negative readings (“-87 w” vs “87”) showing up in the app, but this is due to incorrect installation. I highly recommend testing during the install process to make sure you install the CTs onto the correct phase and correct orientation. I think the directions could be clarified slightly for this reason. I’ve heard directly from Refoss Support that an app update will bring the ability to swap each CT from negative to positive, without having to reinstall each CT.

App Setup & Integration with Home Assistant
The setup of the app was quick and straight forward, automatically finding the device when I opened the Refoss app and then a firmware update that took about 5 minutes. I already had the Meross integration on my Home Assistant instance and HA prompted that a new device had been found and I clicked “Add”.


Each of the circuits in the app are named something like A1, A2, A3…. B1, B2, etc. but you can rename them easily by clicking on the hamburger button (three lines in the top right of the app) to open up the device settings, then click on the first option, “Device name”, then tap the circuit that you want to include a unique name after the circuit identifier to change the name from “A3-A3” to something like “A3-Water Heater”.
How I Chose What Circuits to Monitor in our Electrical Panel
I saved 2 CTs to monitor the 2-phase power coming from our emergency generator. Next, my priority was to monitor our large or power hungry appliances, and then with whatever CTs I had left over, I could monitor a few smaller circuits with wall plugs or lights. Here is how I used each CT on my fully electric home:
- HVAC-Heatstrip – Only monitoring 1 phase (1 CT) of a 240V circuit (2 hots) so I’m using a power factor of 2 because the electrical consumption of an electric heatstrip are the same on both phases.
- Water Heater – Same as above, I’m only monitoring 1 phase using a single CT with a power factor of 2.
- Dryer-A – The electric dryer has a motor on one phase, so I am using 2 CTs, one on each hot wire going to the dryer.
- Dryer-B – See above.
- HVAC-A – Our HVAC has slightly different realtime amp usage per phase, so I again used 2 CTs.
- HVAC-B – See above.
- Dishwasher – 120V so it uses 1 CT.
- Range/Oven – Only monitoring 1 phase (1 CT) of a 240V circuit (2 hots).
- Refrigerator – 120V so it uses 1 CT.
- Washer – 120V so it uses 1 CT.
- Wall Plugs in Living room – 120V so it uses 1 CT.
- Master bedroom plugs – 120V so it uses 1 CT.
- Generator-A – I have 2 CTs installed so that when grid power is out and I’m running our house from our Generator, I am able to see real time current and voltage on both phases. I’m able to create a helper in Home Assistant that combines both amp readings into one number to give the total amps running on the generator.
- Generator-B – See above.
- 2 other wall plug circuits – including our home lab, this brings us to a total of 16 CTs being used.
Electricity Rate Estimation
Within the app you have the ability to add an electricity rate you pay per kWh that the app uses to estimate the cost of usage for a circuit.
The analytics and usage graphs within the app do leave room for improvement, for example, you can only view the usage and electricity cost for one circuit at a time and with 2 main CTs, or 2-4 CTs on an appliance like an HVAC system, you would have to add multiple CTs up to get a monthly total for the panel or appliance. It would be great to have a page on the app that allows the user to select multiple CTs to view historical data for.
Example Entities / Sensors Exposed in Home Assistant with Refoss EM16
- 18 entities (16 + 2) of live readings in amps with tenths (example reading 3.2 A)
- 18 entities of live readings in watts with tenths (example reading 87.5 W).
- 18 entities of live readings of power factor – for more details on power factor, see below.
- 18 entities of live readings in volts with tenths (example reading 124.3 V).
- 18 entities of total watt-hours consumed.
- 1 entity of watt-hours used each day, it auto-resets at midnight.
- WiFi Signal Strength (example 89%).
POWER FACTOR: In electrical terms, “power factor” refers to the ratio of real power (the power actually used to do work) to apparent power (the total power drawn from the electrical supply), essentially measuring how efficiently electrical power is being utilized within a system; a power factor closer to 1 indicates more efficient use of electricity, while a lower power factor means a larger portion of the drawn power is not being used productively

Overview of Features of the Refoss EM16
• Comprehensive Monitoring – The EM16 includes two main circuit transformers (CTs) for whole-home monitoring (200 amps each) and 16 individual CTs (up to 60 amps each) for monitoring specific circuits. This setup covers large and small appliances alike.
• Ease of Installation – The CTs feature a clip-on design, making installation straightforward without the need to disconnect wires from breakers. Each CT plugs into headphone-jack-style ports on a hub that sits inside your panel.
• Wi-Fi Connectivity & Home Assistant Support – The system connects seamlessly to your 2.4 G home Wi-Fi and integrates with the Refoss app for real-time data access and setup and is very simple to add to Home Assistant for advanced automations and monitoring.
• Energy Cost Tracking – You can input your electricity rate into the app, enabling cost estimation for each monitored circuit.
Final Thoughts
Before I get into the example Home Assistant Code below, I wanted to give my final thoughts… the Refoss Smart Energy Monitor EM16 (Amazon link) has become a key component of our home’s energy management. Its ability to monitor large appliances, combined with support for Home Assistant to create smart automations, has provided peace of mind and valuable insights. Despite some minor improvements needed in the app and installation, the EM16 is an excellent choice for anyone serious about understanding and optimizing their home energy usage.
Home Assistant Automation Ideas
Below are some examples of YAML code I used with the entities from the Refoss EM16. Copy the below code to paste into Home Assistant under –> Settings –> Automations and scenes –> + CREATE AUTOMATION. Then start with an empty automation and click the three dots in the top right of the screen and click Edit in YAML. Then paste the code and then change any variables to match your setup. If you are having trouble, use some prompts like help me fix this YAML code in ChatGPT.
- Water heater – 45 minutes of heating – If the water heater has a recovery time over a given time, then send a notification. Situations that could trigger this automation are issues with the water heater or heating elements, a hot water pipe gets broken, or someone takes a really long shower. For this example, you will need to replace both <sensor_number> & <device_name>.
alias: Water heater - 45 minutes of heating.
description: Sends message if the water heater has been heating for the last 45 minutes.
triggers:
  - trigger: numeric_state
    entity_id:
      - sensor.refoss_sem_current_<sensor_number>
    above: 1
    for:
      minutes: 45
      seconds: 0
conditions: []
actions:
  - action: notify.mobile_app_<device_name>
    metadata: {}
    data:
      message: >-
        The water heater has been heating for the last 45 minutes.  Please check
        pipes and water heater if someone has NOT been using a lot of hot water,
        taking a long shower, etc.
      title: ⚠️ Water Heater Recovery - Heating for 45 minutes!
mode: single- Water heater has exceeded its typical current – This notification could be triggered for issues with the water heater heating elements. A family member had calcium deposits build up on the heating element causing the heating element to short circuit, but not enough to trip the circuit breaker. Just like above, change the values within < >.
alias: Water heater has exceeded its typical peak power usage!
description: >-
  Sends message if the water heater has exceeded typical peak power usage.
triggers:
  - trigger: numeric_state
    entity_id:
      - sensor.refoss_sem_current_<sensor_number> # <-- Change this value to be your sensor
    above: 19.3 # Enter your desired amp rating
conditions: []
actions:
  - action: notify.mobile_app_<device_name> # <-- Change this value to be your device.
    metadata: {}
    data:
      message: ⚠️ Water heater has exceeded 19.3 Amps!
mode: single- Stove/Oven Usage Reminder – This triggers a notification if the stove/oven is left on for over a period of time. This could be combined with a presence sensor in the kitchen. This automation takes into account the fact that an electric stove will cycle on and off.
alias: Stove/Oven Usage Reminder
description: Sends a notification if the stove/oven has been ON for over 90 minutes.
triggers:
  - entity_id: sensor.refoss_sem_current_<sensor_number> # <-- Change this value
    trigger: state
conditions: []
actions:
  - variables:
      power_threshold: 1  # <-- Defines the minimum current in amps.
      cycle_duration: 90 # <-- Alert is sent after this many minutes after monitoring for the cycle_duration
  - choose:
      - conditions:
          - condition: template
            value_template: >
              {% set history =
              states.sensor.refoss_sem_current_<sensor_number>.attributes.power_samples %} {%
              set threshold = power_threshold %} {% set active_minutes = history
              | select('>', threshold) | list | length * 5 / 60 %} {{
              active_minutes >= cycle_duration }}
        sequence:
          - data:
              title: ⚠️ Stove/Oven Reminder
              message: >
                The stove/oven has been ON for more than 90 minutes. Please
                check if it was accidentally left on!
          - action: notify.mobile_app_<device_name> # <-- Change value to your device
            data:
              message: >-
                The stove/oven has been ON for more than 90 minutes. Please
                check if it was accidentally left on!
              title: ⚠️ Stove/Oven Reminder
mode: single- Dryer is done! – This automation triggers when the current (amps) to the dryer drops below a set threshold. This would work for both electric and gas dryers, as long as it’s on a dedicated circuit. This is a great idea how to make an old dryer smart so that your clothes don’t get wrinkled. This notification is sent after two minutes and 30 seconds, so that you can open the dryer door to check on the clothes and restart the dryer without the notification being sent.
alias: Dryer is done!
description: Sends notification when the dryer is finished
triggers:
  - entity_id:
      - sensor.refoss_sem_current_<sensor_number> # <-- Change this value
    below: 1 # <-- Minimum value threshold in amps
    for:
      hours: 0
      minutes: 2 # <-- Time value after power drops below the amp rating for this period of time, also using seconds below.
      seconds: 30
    trigger: numeric_state
conditions: []
actions:
  - data:
      message: ✅ Dryer is Finished! 👖☀️
    action: notify.mobile_app_<device_name> # <-- Change value to your device
mode: single- Washer is Finished! – This automation triggers when the current (amps) to the clothes washer drops below a set threshold, indicating that the washer cycle is finished and the clothes are ready to be moved to the dryer. You could combine this with a notification just to the people who are home so that the clothes don’t start to smell after sitting too long. This notification is sent after eight minutes below the threshold of .5 amps as a washer will cycle on an off and may spin up and down several times and sit & soak, so you may need to play with the configuration.
alias: Washer is Finished!
description: Sends notification when the clothes washer is finished
triggers:
  - entity_id:
      - sensor.refoss_sem_current_<sensor_number> # <-- Change this value
    below: 0.5 # <-- Minimum value threshold in amps
    for:
      hours: 0
      minutes: 8 # <-- Time value after power drops below the amp rating for this period of time.
      seconds: 0
    trigger: numeric_state
conditions: []
actions:
  - data:
      message: Washer is Finished! 👔👖
    action: notify.mobile_app_<device_name> # <-- Change value to your device
mode: single- Dishwasher is Finished! – This automation triggers when the current (amps) to the dishwasher drops below a set threshold, indicating that the washer cycle is finished and the clean dishes are ready to put away. Also a great way to make a non-smart dishwasher, work with your smart home.
alias: Dishwasher is Finished!
description: Sends notification when the Dishwasher is finished
triggers:
  - entity_id:
      - sensor.refoss_sem_current_<sensor_number> # <-- Change this value
    below: 0.5
    for:
      hours: 0
      minutes: 8
      seconds: 0
    trigger: numeric_state
conditions: []
actions:
  - data:
      message: ✅ Dishwasher is Finished! 🫙💦
    action: notify.mobile_app_<device_name> # <-- Change this value
mode: single
- Home Voltage Monitoring – This automation triggers when the voltage for any single sensor drops below the set voltage threshold. Voltage drops can be an early warning sign of faulty wiring, failing appliance or an electrical issue. The below automation sends an alert whenever any of your monitored circuits drop below 110V. Depending on your area and grid fluctuations, you may be able to raise the threshold to 114V so feel free to dial this in after you get some voltage history in Home Assistant for what is typical for your area. Keep in mind that the voltage of your energy grid supply can drop lower in high demand times. Using a simple YAML automation, Home Assistant will continuously monitor voltage levels and notify you the moment a drop is detected. This automation won’t get triggered by all of the sensors at the same time causing multiple notification and also have a cool down period of 10 minutes before the automation will re-fire the notification.
alias: "Low Voltage Notification (With 10-Minute Cooldown)"
id: "low_voltage_alert_cooldown"
mode: restart  # Ensures only one notification is active at a time
trigger:
  - platform: numeric_state
    entity_id:
      - sensor.refoss_sem_voltage_1
      - sensor.refoss_sem_voltage_2
      - sensor.refoss_sem_voltage_3
      - sensor.refoss_sem_voltage_4
      - sensor.refoss_sem_voltage_5
      - sensor.refoss_sem_voltage_6
      - sensor.refoss_sem_voltage_7
      - sensor.refoss_sem_voltage_8
      - sensor.refoss_sem_voltage_9
      - sensor.refoss_sem_voltage_10
      - sensor.refoss_sem_voltage_11
      - sensor.refoss_sem_voltage_12
      - sensor.refoss_sem_voltage_13
      - sensor.refoss_sem_voltage_14
      - sensor.refoss_sem_voltage_15
      - sensor.refoss_sem_voltage_16
      - sensor.refoss_sem_voltage_17
      - sensor.refoss_sem_voltage_18
    below: 110
action:
  - service: notify.mobile_app_<device_name> # <-- Change this value
    data:
      title: "Low Voltage Alert"
      message: >
        {% set low_sensors = expand(
          'sensor.refoss_sem_voltage_1',
          'sensor.refoss_sem_voltage_2',
          'sensor.refoss_sem_voltage_3',
          'sensor.refoss_sem_voltage_4',
          'sensor.refoss_sem_voltage_5',
          'sensor.refoss_sem_voltage_6',
          'sensor.refoss_sem_voltage_7',
          'sensor.refoss_sem_voltage_8',
          'sensor.refoss_sem_voltage_9',
          'sensor.refoss_sem_voltage_10',
          'sensor.refoss_sem_voltage_11',
          'sensor.refoss_sem_voltage_12',
          'sensor.refoss_sem_voltage_13',
          'sensor.refoss_sem_voltage_14',
          'sensor.refoss_sem_voltage_15',
          'sensor.refoss_sem_voltage_16',
          'sensor.refoss_sem_voltage_17',
          'sensor.refoss_sem_voltage_18'
        ) | selectattr('state', 'lt', '110') | map(attribute='entity_id') | list %}

        Voltage below 110V detected on:
        {{ low_sensors | join(', ') }}

  - delay: "00:10:00"  # Wait 10 minutes before allowing another trigger
Home Voltage Fluctuation Monitoring – Monitoring your home’s electrical system is crucial for preventing power issues and protecting sensitive electronics. This Home Assistant automation detects when any monitored circuit deviates by more than 2% from the average voltage of the rest of the other sensors. When an anomaly is detected, an instant notification is sent to your mobile device, allowing you to take proactive measures. NOTE: I’m purposely not monitoring the 2 main sensors (the main lugs of phase A and phase B, so you will not see sensor 1 and 7 on the sensor list.
alias: "Voltage Out of Range Notification"
id: "voltage_out_of_range"
mode: single
trigger:
  - platform: state
    entity_id:
      - sensor.refoss_sem_voltage_2 # <-- main sensor (1) purposefully excluded
      - sensor.refoss_sem_voltage_3
      - sensor.refoss_sem_voltage_4
      - sensor.refoss_sem_voltage_5
      - sensor.refoss_sem_voltage_6
      - sensor.refoss_sem_voltage_8 # <-- main sensor (7) purposefully excluded
      - sensor.refoss_sem_voltage_9
      - sensor.refoss_sem_voltage_10
      - sensor.refoss_sem_voltage_11
      - sensor.refoss_sem_voltage_12
      - sensor.refoss_sem_voltage_13
      - sensor.refoss_sem_voltage_14
      - sensor.refoss_sem_voltage_15
      - sensor.refoss_sem_voltage_16
      - sensor.refoss_sem_voltage_17
      - sensor.refoss_sem_voltage_18
condition:
  - condition: template
    value_template: >
      {% set sensors = [
        states('sensor.refoss_sem_voltage_2')|float(0),
        states('sensor.refoss_sem_voltage_3')|float(0),
        states('sensor.refoss_sem_voltage_4')|float(0),
        states('sensor.refoss_sem_voltage_5')|float(0),
        states('sensor.refoss_sem_voltage_6')|float(0),
        states('sensor.refoss_sem_voltage_8')|float(0),
        states('sensor.refoss_sem_voltage_9')|float(0),
        states('sensor.refoss_sem_voltage_10')|float(0),
        states('sensor.refoss_sem_voltage_11')|float(0),
        states('sensor.refoss_sem_voltage_12')|float(0),
        states('sensor.refoss_sem_voltage_13')|float(0),
        states('sensor.refoss_sem_voltage_14')|float(0),
        states('sensor.refoss_sem_voltage_15')|float(0),
        states('sensor.refoss_sem_voltage_16')|float(0),
        states('sensor.refoss_sem_voltage_17')|float(0),
        states('sensor.refoss_sem_voltage_18')|float(0)
      ] %}
      {% set avg_voltage = sensors | sum / sensors | length %}
      {% set threshold = avg_voltage * 0.02 %}
      {% for sensor in sensors %}
        {% if (sensor > avg_voltage + threshold) or (sensor < avg_voltage - threshold) %}
          {{ true }}
        {% endif %}
      {% endfor %}
      {{ false }}
action:
  - service: notify.mobile_app_<device_name> # <-- Change this value
    data:
      title: "Voltage deviation detected!"
      message: "A voltage deviation of greater than 2% was detected on a circuit"

